Showing posts with label Simple. Show all posts

8.01.2013

Oven Roasted Sausage and Vegetables

0 comments


We had a cold front come through that made it feel like Fall around here for a few days.  I've had this recipe pinned for a while and the cool weather inspired me to give it a shot.  It's a simple recipe that is easy to make, easy to clean up, and tastes great!  The picture doesn't do it justice, but all of the different colors from all of the vegetables made it very pretty to look at well.  If you use turkey or chicken sausage, it would be incredible healthy.  This is also one of those rare recipes that even tastes really good the next day.  Maybe even better than when I originally made it.  Which was good, because as I made it, it made two 9x13 pans of food.  You might want to cut the recipe down . . . 

I served mine this with corn casserole and it was a nice pairing.  I was a bit timid about the banana peppers as I was afraid they would make the dish too spicy, but it really turned out fairly mild and the banana peppers were not at all overwhelming.

Adapted From:  Lilasapron

What you need:
28 oz precooked Sausage (I used polish sausage)
2 Lbs New Potatoes
1 Small Jar Sliced Banana Peppers, drained
1-2 Bell Peppers (I used one green and one orange)
1 Large Onion (I used white)
8 oz Mushrooms
3 Tbsp Olive Oil
Salt, Pepper and Other Seasonings to taste

What you do:
1.  Preheat your oven to 400 degrees.

2.  Slice the sausage, peppers, potatoes, onion, and mushrooms and toss them into a large bowl. 

3. Drizzle the sausage and veggies with olive oil.  Toss until the sausage and veggies are evenly coated in olive oil. 

4.  Add salt, pepper and other seasonings and toss again until the seasonings are evenly distributed.  I added some garlic powder and Lawry's Seasoned Salt.

5.  Place the peppers and vegetables in a 9x13 baking pan (or two, depending on how much you've made).  Cover the pans with foil and bake for about 45 minutes.  Remove foil and continue baking for 5-10 more minutes, or until the potatoes are fully cooked. 

Enjoy!

1.09.2013

Crock-Pot Gumbo

0 comments


I had homemade gumbo once a few years back and fell in love with it.  I've bought store-made gumbo since then and it just hasn't quite stood up.  So, I decided to give making gumbo a shot myself.  I'm not sure why, but I was very intimidated by the idea, thinking it was surely going to be quite complicated.  Turns out, it wasn't.  And, for bonus points, I made mine in my crock-pot so it's totally a set it and forget it gumbo which makes it doubly easy. 

I will warn you, though, that this recipe is quite spicy.  If you are shy about spicy food, I suggest you cut down the cayenne pepper a bit.  If it's too dull for you in the end, toss in a bit more cayenne pepper to spice it up.  I served my gumbo with homemade honey corn bread, which was a bit sweet and complimented the spicy gumbo very well.  Yum!

Adapted from: Cats and Casseroles

What you need:
1 lb. Boneless, Skinless Chicken Breast
14 oz Andouille Sausage
28 oz Can of Diced Tomatoes (undrained)
1 Large Onion
1 Large Green Bell Pepper
1 Cup Chopped Celery
2-3 Cups of Chicken Broth
2 Tsp Dried Oregano
2 Tsp Dried Parsley
2+ Tsp Cajun Seasoning
2+ Tsp Cumin
1 Tsp Cayenne Pepper
2 Chicken Bullion Cubes
A Touch of Kosher Salt
1 Cup Cooked White Rice


What you do:
1.  Chop the onion, bell pepper and celery into large chunks.  Place in crock-pot.

2.  Add the tomatoes, 1 cup of chicken broth, oregano, parsley, 2 tsp Cajun seasoning, 2 tsp cumin, cayenne pepper, and chicken bullion cubes to the crock pot. 

3.  Season both sides of your chicken as you would like.  I used a bit of kosher salt, Cajun seasoning, and cumin.  Wrap the chicken in foil.  Place the foil-wrapped chicken on top of everything that is in the crock-pot. 

4.  Put the lid on your crock-pot and cook for 3-4 hours on low heat or 7-8 hours on high heat.  Cooking time will vary depending on your crock-pot. 

5.  After the cooking time has elapsed, remove the foil-wrapped chicken from the crock-pot.  USE TONGS!  It's hot in there, folks. 

6.  Set the chicken to the side to cool for a couple of minutes.  Meanwhile, add an additional 1-2 cups of chicken broth to the crock-pot if you would like for your gumbo to have more liquid. 

7.  Thinly slice the sausage and add it to the crock-pot. 

8.  Unwrap the chicken and shred it using a fork and knife.  Add it to the crock-pot. 

9.  Let the contents of the crock-pot continue to cook while you make the white rice according to the instructions on the package.  

10.  Serve the gumbo by putting some gumbo in a bowl and then adding a bit of rice to each serving. 

Enjoy!

**Tip**  If you add the white rice to the gumbo, the rice will absorb a lot of the liquid if you store leftovers.  That's why I tell you to make it separately and add a bit as you serve it.  Be sure to store the rice separately as well and your gumbo will remain moist. 

**Tip** Cooking the chicken in foil on top of the rest of the gumbo prevents the meat from deteriorating and become tough or dry.  A lot of people dislike meat cooked in a crock-pot for those reasons.  Trust me on this one -- cook the chicken in foil and you'll have super tender and delicious chicken for your gumbo. 


12.13.2012

Healthy Banana Muffins

0 comments


If you've paid any attention to my blog at all, you've probably figured out that healthy really isn't my thing.  Delicious is my thing.  Unfortunately, the two often don't go hand-in-hand.  However, that doesn't stop my from trying healthy recipes that look or sound good.  The majority of the time, they're a flop and they never make it here.  But, every once in a while, I stumble upon a special recipe that is both healthy and delicious.  This, my friends, is one of those.  

These banana muffins contain no flour and no oil or butter.  I even reduced the amount of sugar from the original recipe and substituted honey instead.  These muffins are really dense, so it doesn't take a lot to fill you up.  They're also really moist.  And, I think you could really change the recipe up a lot by adding in different fruits as they are in season.  

Adapted from: Chase and Em

What you need:
2 1/2 Cups Quick Cooking Oats
1 Cup Plain Low Fat Greek Yogurt
2 Eggs
1/2 Cup Brown Sugar
1/4 Cup Honey
1 1/5 Tsp Baking Powder
1/2 Tsp Baking Soda
2 Ripe Bananas
2 Tsp Cinnamon 

What you do:
1.  Preheat your oven to 400 degrees. 

2.  Line your muffin tins with muffin liners. 

3.  Place the quick cooking oats into your blender or food processor.  Blend until the oats are pulverized. 

4.  Place the rest of the ingredients into the blender with the oats and blend until fully mixed. (I may have a super weak blender, but this took quite a while.  I'd have to blend and then stir up and blend and stir up.  It wasn't difficult, but it wasn't accomplished all at once either). 

5.  Fill each cupcake liner until it's about 2/3 full and bake for about 15-20 minutes, or until a toothpick inserted in the center of a muffin comes out clean. 

Enjoy!

11.15.2012

Breakfast Pizza

0 comments


Sometimes, I have leftover pizza for breakfast.  Sometimes, I have leftover breakfast for dinner.  Pizza and breakfast food are two of my favorite things.  The only logical thing to do, then, is to marry the two together, right?  Right.  And, that is exactly what I did.  You can thank me later.

What you need:
1 Pizza Dough*
1 Can of Sausage Gravy
1/2 Lb. cooked breakfast meat of your choosing (I used bacon)
6 Eggs, scrambled
1 1/2 Cups shredded cheddar cheese
Any veggie toppings you want on your pizza ( I added mushrooms)

*I make my own pizza dough using a recipe that I haven't been authorized to share.  You can always pick up a pre-made crust at the store or you can buy a can of pizza dough just like a can of biscuits and cook the dough yourself.

What you need to do:
1.  Cook and drain your breakfast meat and scramble your eggs.

2.  Preheat your oven according to the directions on your pizza dough.  Prepare your pizza dough and lay it out on your baking stone or pizza pan, but do not bake the dough.

3.  Spread a generous amount of sausage gravy on top of your cooked pizza crust (as if it were pizza sauce).

4.  Sprinkle your cooked breakfast meat on top of the sausage gravy.

5.  Sprinkle scrambled eggs on top of the sausage gravy and meat.

6.  Sprinkle any veggie toppings on top of the other toppings.

7.  Sprinkle shredded cheese on top of the pizza.

8.  Bake according to pizza dough directions. 

Enjoy!

9.07.2012

Pepperoni Roll-Ups

0 comments


My friend Amber bought a house earlier this year.  She had a housewarming party, like, a month later.  I bought a house last year.  I haven't had my housewarming party yet.  When I do have it, it will be more than a year later.  But, whatever.  I'm not bitter.  At all. 

Amber was nice enough to let me bring lots of food to her housewarming party.  That meant that I got to try lots of new recipes. This one was a big hit!  Everybody loves pepperoni and melted cheese.  Toss in a crisp, buttery crescent roll . . . Perfect!  Plus, these get bonus points for being really easy to make. 

Source:  The Girl Who Ate Everything

What you need:
2 packages refrigerated Crescent Roll dough, garlic flavored
8 Cheese Sticks, halved
48-64 pieces of Pepperoni
Marinara Sauce and Ranch Dressing for dipping

What you do:
1.  Preheat your oven to 350 degrees. 
2.  Place 3 to 4 pepperoni pieces on the bottom of the triangle of each 
     crescent roll. 
3.  Place one cheese stick half on top of the pepperoni on each 
     crescent roll. 
4.  Roll up each crescent roll and place seam side down on a cookie sheet. 
5.  Bake for 10-12 minutes or until the crescent rolls are cooked 
     thoroughly (until they are golden brown).
6.  You can put out small bowls of marinara sauce and ranch dressing 
     for dipping if you would like. 

Enjoy!

7.09.2012

Copy Cat Recipe: Mini Warm Delights

2 comments


I've eyed these Mini Warm Delights in the grocery store for a looooong time, but always refused to buy them because you have to pay about $3.00 for two teeeeeny tiny little single serving cakes.  I also thought that if I wanted a chocolate cake that bad, I'd just whip up an entire cake.  Well, in a moment of weakness, I finally bought them a few weeks ago.  I thought they were good, but still didn't think they were worth $1.50 each.  However, I was quite consumed with the idea of making myself a delicious little cake in just a couple of minutes. So, I decided I'd try to copy the recipe. 


I searched the Internet far and wide and found a lot of different recipes, but none were really all that appealing to me.  So, I experimented with my own recipe.  It turned out fabulous!  Much better than I ever could have expected.  And, I did a little taste test with my man friend and we both determined that my little recipe beats the Mini Warm Delights!  My cakes are more moist and more dense than the Mini Warm Delights.  I also think mine have a stronger chocolate flavor.  Take that Betty Crocker! ;-)  


I will warn you, the recipe below makes massive quantities.  But, you have options.  You can  make the recipe as directed below and store your mix in Tupperware at home.  I've even placed individual servings into small sandwich baggies and taken them to work so that whenever I need chocolate, it's there for me.  Or you can just cut the recipe down and have less on hand -- if you do so, just make sure you maintain the chocolate cake mix to brownie mix ratio (1:2). 


What you need for the cakes:
1 Chocolate Cake Mix
1 Box of Instant Chocolate Pudding
2 Boxes of Chocolate Brownie Mix
Miniature Chocolate Chips
Water


What you do to make the mix:
1.  Pour the chocolate cake mix and instant pudding mix into one bowl.  Stir well to combine the two powders.
  
2.  Add the two boxes of brownie mix.  Stir well. 


THAT'S IT!


When you want to make yourself a little cake, put 1/4 cup of the mixture and a teaspoon or two of miniature chocolate chips into a ramekin dish.  Add 7 Tsps (or 2 Tblsps + 1 Tsp) of water.  Stir well with a fork.  Microwave for 30-45 seconds. Then enjoy!


I put 1/4 cup of the mixture + some miniature chocolate chips into some baggies and took those, a ramekin, and a teaspoon to work.  So, when I need a little pick-me-up, it's there -- more delicious than the Mini Warm Delights, less expensive, and just as convenient!


Also, if you add about 1 Tsp of  Fudge Ice Cream Topping (like this, not like Hersey's Syrup) to the center of the ramekin before you microwave, you end up with a mini lava cake.  See the gooey fudge there:


Experiment away with toppings for these little cakes!  We've added whipped topping and ice cream and loved both! 


Enjoy!

4.26.2012

Heath Bar Cake

0 comments


My mom has this very sweet friend at her work named Karen.  Karen is a great cook and has a heart of gold.  One year for Christmas she made me a homemade recipe book with some of her family recipes.  It is still my only recipe book.  Right before Easter my mom told me about this great cake that Karen had brought in to work and asked me to make it for Easter.  This cake is delicious and ridiculously easy.  I made mine the night before Easter and let it sit overnight, which I think made it even more moist and delicious. 


Here's what you'll need:
1 Chocolate Cake Mix and the additional ingredients called for on the box
1 Can Condensed Milk
1 Tub of Cool Whip
1 Jar of Caramel Sundae Sauce
1 1/2 King Size Heath Bars


Here's what you do:
1.  Make the chocolate cake according to the box instructions. 


2.  Let the cake cool slightly (about 7 minutes).  Take the handle end of a wooden spoon (or something of similar size) and poke holes throughout the cake.  I made mine pretty uniform in a grid pattern. 


3.  Pour the caramel sundae sauce and condensed milk over the entire cake, trying to distribute evenly. 


4.  Cover and refrigerate for at least one hour. 


5.  While the cake is in the refrigerator, crush the heath bars.  (I put mine in a Ziploc baggie and used my wooden spoon to break up the bars). 


6.  After the cake has chilled for at least one hour, "frost" the cake with cool whip. 


7.  Garnish the cake with the Heath Bar pieces.  I suggest waiting until right before serving to garnish. 


Enjoy!

4.03.2012

Easter S'Mores Jars

0 comments


I found this absolutely adorable idea on Pinterest and I COULD. NOT. RESIST. These jars are cute as a button!  And, the person you give them to gets to add a few ingredients and make them into S'mores Bars.  Perfect!  The jars are simple to assemble and the bars are easy for the recipient to make.  This is a perfect Easter Gift for the little people in your lives, but some adult supervision will be required to make the S'mores Bars.  My mom and I made a  whole batch of these jars to give to the kids in our family. 


Adapted from: Creative Holiday Gift Ideas


Here's what you need to make 1 jar:
1 One Quart Mason Jar
23 Hersey Kisses
8 Peeps
1/2 of a sleeve of Graham Crackers, crushed
1/4 cup of Brown Sugar


Here's what you do to assemble the jar:
1.  Clean the jar. 
2.  Put the crushed Graham Crackers in a baggie.  Add the Brown Sugar.  Set aside.
3.  Put the Hersey Kisses in the bottom of the jar. 
4.  Put the Peeps in the jar, with their faces facing out (so you can see their faces from the outside).  We could only fit 7 around the perimeter of the jar, so we stuck the 8th one inside the "circle" of Peeps.  
5.  Put the baggie of Graham Crackers and Brown sugar inside the jar above peeps. 
6.  Put the lid on the mason jar. 
7.  Create a recipe card with the instructions listed below.  Attach the recipe card to the jar with a piece of festive ribbon.  Ta Da!  You're done!


For the recipe card:
1.  Remove the contents of the jar and put on the kitchen counter. 
2.  Unwrap and cut Hersey Kisses into halves or quarters.  Put in a medium sized mixing bowl. 
3.  Cut (or tear) the Peeps into pieces.  Add to the mixing bowl. 
4.  Add the contents of the baggie to the mixing bowl. 
5.  Add 1 tsp of Vanilla to the mixing bowl. 
6.  Add 1/4 cup of melted Butter to the mixing bowl. 
7.  Stir the contents of the mixing bowl well. 
8.  Pour the contents of the mixing bowl into a small, well-greased baking dish. 
9.  Bake at 350 degrees for 12-15 minutes. 


Enjoy!  Happy Easter!!


2.17.2012

Baked Taquitos

0 comments


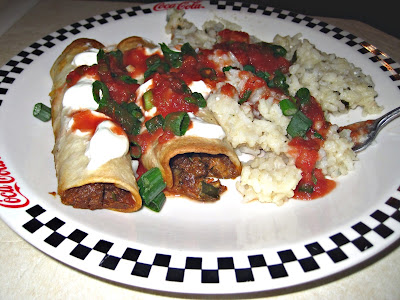
Here's a quick little dinner recipe that tastes great and is a healthy alternative to the fried taquito.  Although these are baked, they didn't come out soggy.  Instead that were nice and crispy, similar to fried taquitos.  I served mine with cilantro lime rice and it was a perfect pair.   


I found the recipe I based these off of on Pinterest.  The original recipe provides that the taquitos can be frozen and baked later.  I didn't get a chance to try freezing them because I ate them all.  But, I'm pretty sure you would have the same success freezing my modification of her recipe.  


Modified from: Pennies on a Platter


Here's what you need:
3 ounces Cream Cheese, softened
1/4 cup Salsa
1 Lime
1/2 tsp Ground Cumin
1 tsp Chili Powder
1/2 tsp Onion Powder
2 cloves Garlic, minced
3 tbsp Cilantro, finely chopped
2 tbsp Green Onions, sliced
1 lb. Ground Beef
1 Taco Meat Season Packet of your choice
1 cup Mexican flavored cheese, finely shredded
12 small Tortillas
1 tbsp Butter, melted
Kosher Salt


Here's what you do:
1.  Cook the ground beef thoroughly.  Season according to instructions on your season packet. 


2.  Combine cream cheese, salsa, juice of half of the lime, cumin, chili powder, onion powder, garlic, cilantro and green onions. 


3.  Add the ground beef to the cream cheese mixture.  Mix well. 


4.  Add the cheese to the cream cheese mixture.  Mix well. 


5.  Preheat your oven to 425 degrees. 


6.  Microwave 2 or 3 tortillas for about 20 seconds to make them pliable and easy to work with.  Fill each tortilla with a portion of the mixture, beginning on one edge.  Roll the tortilla up, beginning with the edge that was filled.  Place seam side down in a baking dish or cookie sheet.  Repeat until all of the mixture is gone. 


7.  Brush the top of each tortilla with the melted butter. 


8.  Sprinkle the kosher salt on top of the tortillas. 


9.  Sprinkle the lime juice of the remaining one half of the lime on top of the tortillas. 


10.  Bake for about 20 minutes.   Remove when the tortillas begin to crisp.  

2.07.2012

Energy Balls

0 comments


My good friend Amber suggested that I try her AMAZING recipe for energy balls.  A while ago.  Like, last October.  I quickly opened the recipe because I get all excited when my friends and family share recipes with me!  Then I read the ingredients and quickly closed the recipe.  Pfffffft!  This recipe calls for wheat germ or flaxseed.   And no sugar.  At all!?!  NO SUGAR????  Are you kidding me?   Clearly, she didn't know me very well.  

So I thanked her for her recipe and told her I'd put it on my list of recipes to try.  Then I scoffed inside.  Because I knew there was nooooo way I was going to make that silly hippie food. 

Well, I've been feeling a little low on energy lately (helllllooo 15 hour work days).  So, this weekend I got desperate.  And decided to try her hippie energy balls.  I had most of the ingredients on hand, so why not?  And, I just knew that when I ate one and it tasted like cardboard, I'd be vindicated.  And I could return to sugar as my main source of energy. 

So, I made them.  And then I ate one.  And then I ate like one million more.  Because these things are deeeelicious, people.  There's no saving my pride here, folks.  I owe Amber one big fat apology.  So, here it is.  You were right and I was wrong.  (God, I hate how that sounds!)

Have a little faith in me and give these things a shot.  Seriously, I promise, you won't be disappointed.  They require very few ingredients and very little time.  They're scrumptious, healthy, and they give you energy.  What do you have to lose? 

I like these so much that I'm already trying to come up with variations.  But, for now, here is my version of Amber's  Energy Balls:

Here's what you need:
1 cup Quick Oats
2 heaping tbsp Peanut Butter
1/2 cup Honey
1 cup mini chocolate chips
1/2 c wheat germ or flaxseed
2 tsp Vanilla

Here's what you do:
1.  Mix everything together. 
2.  Refrigerate for 1 hour. 
3.  Roll into one inch balls. 
4.  Enjoy!  Seriously -- that's it. 

FYI -- Amber's recipe also called for coconut and dried fruit.  I'm picky.  I don't like coconut, so I omitted that.  And dried fruit just didn't sound like it would fit all that well with all the other ingredients, so I kicked that out too.  I could have been wrong about that.  I've been wrong about other things.  *aaahheeemm*  Feel free to add those back in.  She suggested a cup of each. 

1.08.2012

Cilantro Lime Rice

0 comments


(Please excuse the terrible photo.  Apparently I was so excited to eat
my cilantro lime rice that I didn't have time to take a decent pic.)


If you like Chipotle's rice, you're gonna LOVE this stuff.  It's one million times better than Chipotle's rice.  Trust me.  It's like the crack of rice. 


Apparently, it's a copycat recipe for rice served at a restaurant called Cafe Rio.  I've never been there.  But, if they serve stuff like this, eating there is going on my bucket list.  I got the recipe from The Girl Who Ate Everything. 


I use it as a side dish for Mexican meals.  I also use it to make burrito bowls, Chipotle style.  It's simple to make and uses relatively few ingredients. 


Slightly adapted from:  The Girl Who Ate Everything. 


Here's what you need:
2 Tb. Butter 
1 ¼ White Rice
Juice of 2 Limes 
2 ¼ cups Chicken Broth
2 Tb. chopped fresh Cilantro
¾ tsp. Salt
¼ tsp. Cumin 


Here's what you do:
1.  In a sauce pan, melt the butter with the rice. 


2.  Add the juice of the limes, chicken broth, cilantro, salt, and cumin. 


3.  Bring to a boil. 


4.  Once it reaches a boil, reduce heat, cover and cook for 20 minutes. 


Enjoy!

11.22.2011

Peanut Butter Pie

0 comments


There are certain dishes that I make every year, but only at certain times of the year.  This is one of them.  This is a delicious recipe that is easy to make, but tastes like it isn't.  I'm not sure where the recipe came from . . . I may have gotten it from my Aunt Julie.  But maybe not . . . 


Anyhow, who doesn't like creamy peanut butter with a little chocolate on top?  Nobody.  That's who.  So, why don't I make this pie more often, you ask?  Because it's very rich.  It doesn't matter how delicious a recipe is, too much of a good thing can be bad.  So, I save this pie for holiday time.  Although sometimes I make it and keep it in the fridge for breakfast.  For myself.  And I don't share.  


Here's what you need:
1 Block of Cream Cheese, room temperature
1 Cup of Creamy Peanut Butter
1 Cup of Sugar
1 Cup of Heavy Whipping Cream 
1 Pie Crust (sometimes I use a graham cracker crust and sometimes I use a chocolate one)
Chocolate Dessert Topping or Spare Chocolate Chips for Topping (optional)
Whipped Cream for Topping (optional)


Here's what you do:
1.  Mix the Cream Cheese, Peanut Butter, Sugar, and 1/3 of the Cup of Heavy Whipping Cream until well blended. 


2.  Fold in the remaining Heavy Whipping Cream. 


3.  Gently spoon the mixture into a pie crust and smooth. 


4.  Drizzle Chocolate Dessert Topping on top and use a fork or knife to create a pretty design. 


     Hint:  If you don't have Chocolate Dessert Topping, melt a few chocolate chips with 
      some of the remaining heavy whipping cream.  Make sure you stir well to combine 
      and then put that on top of the pie and proceed with step 4. 


5.  Refrigerate for at least one hour. 


6.  Cut into tiny pieces for serving.  Top with whipped cream if desired. 


Enjoy! 

11.07.2011

Parmesan Crusted Pork Chops

0 comments


My sister, Brooke, gave me this recipe.  I may have changed it a bit because when she gave me the recipe she told me she used "some" bread crumbs, and "a lot" of Parmesan cheese.  I used to cook all carefree like that.  And then, I started a blog . . . 


So, I took her recipe and guessed about what "some" and "a lot" meant.  I think I must have been close, because the result was quite tasty.  It's also surprisingly simple to make.  And, I think it's pretty versatile. I served my chops with fettuccine alfredo and steamed broccoli, which were both a nice compliment.  Brooke says she usually serves hers with cheesy rice.  After having tried the chops, I'd guess that the cheesy rice would go well too. 


Here's what you need:
6 Thinly sliced Pork Chops
1 Cup Italian Bread Crumbs
1 Cup finely grated Parmesan Cheese
1 Tsp Garlic Powder
Salt and Pepper to taste
2 Eggs
Vegetable oil for browning the chops 


Here's what you do: 
1.  Combine the bread crumbs, Parmesan cheese, garlic powder, salt and pepper in a bowl.  


2.  In a separate bowl, whisk the eggs until well beaten. 


3.  Put a pan on the stove on medium to medium-high heat.  Add vegetable oil and allow the oil to get warm.


4.  While you're waiting for the vegetable oil to heat up, preheat the oven to 350 degrees and cover a cookie sheet in aluminum foil.


5.  Coat one pork chop in the bread crumb mixture.  Dip it in the beaten eggs.  Return it to the bread crumb mixture and coat again.  Immediately put the pork chop in the pan of warm oil.  Cook each side of the pork chop until it is golden brown and then remove from pan and place on cookie sheet. 


     Hint: While I had one pork chop in the pan cooking, I started step number 5 on 
      the next pork chop, paying close attention to the pork chop on the stove to 
      make sure it didn't burn. 


7.  Once all the pork chops have been browned and are on the cookie sheet, place the cookie sheet in the oven and bake for about 35 minutes, or until the chops are cooked all the way through. 


Enjoy!

11.04.2011

Fiesta Chicken Pockets

0 comments
Sooo, I have good news and I have bad news.  The good news is, I've made some really good food lately.  The bad news is, I've forgotten to take pictures of my good food.  Which means I can't post about them.  Bummer!

I do have one exception though.  Remember when I made these chicken pillows?  Well, I made them again, but I spiffied them up a bit.  I figure since you can go here and see something close to what they're supposed to look like, it's okay for me to post without a picture, right?  Besides, I don't have anything else to post right now.  And something is better than nothing, right? 

Also, nobody came up with any fabulous name ideas for the chicken pillows, so I went ahead and spiffied up the name myself while I was spiffing up the recipe.  It's no literary gold, but I'm pretty sure anything beats "chicken pillows".  I made these one Sunday after working on my house all day.  My mom had thrown the chicken in the crock pot that morning, which made it delicious and super tender, and I threw the pockets together that evening.  They came out delicious and were really simple -- especially since the chick was already cooked. 

Here's what you need:
2 Boneless, skinless chicken breasts
1 Bunch of Green Onions
8 Ounces Cream Cheese, Softened
2 Can of Crescent Rolls
2 Cans of Rotel, well drained
1 Can of Green Chilies, well drained

Here's what you do:
1.  Season the meat and cook it in the crock pot all day. 

2.  Finely slice the green onions. 

3.  Drain the Rotel and green chilies well. 

     Hint:  Failing to drain these well will result in the chicken pockets being 
      mushy.

4.  Mix the green onions, Rotel, and green chilies with the cream cheese. 

5.  Add the cooled chicken to the cream cheese mixture. 

6.  Open the cans of crescent rolls and divide the dough into 16 triangles. 

7.  Place one scoop of the cream cheese mixture in the middle of each crescent roll triangle.

8.  Roll up each crescent roll like a jelly roll (beginning with the widest end).

9.  Ensure that all seams are tightly sealed on each pillow. 

10.  Place the pockets on a cookie sheet, with as many seams down (against the cookie sheet) as possible. 

11.  Bake for about 12 minutes.  Remove them from the oven when the crescent roll is golden brown and flaky.
 
Enjoy!


10.26.2011

Peanut Butter Jack-o-Lanterns

0 comments


So, I bought this house.  It sounded like a good idea at one time.  I'm pretty sure it's brought out the worst in me.  When it comes to this house, I cannot make a decision to save my life.  I've frustrated everyone around me.  Plus me. 

Anyway, when I get frustrated I like to eat delicious food (I also like to eat delicious food when I'm not frustrated -- in case you were wondering).  I've made these peanut butter balls before and they were delicious.  They are very rich and satisfying.  If you like Peanut Butter Pie, I guarantee you'll love this recipe! 

So, I decided to make this recipe again to ease my woes.  Or distract me from having to make decisions.  Whatever.  Since it's almost Halloween, I decided to add a little Halloween twist.  Halloween is one of my favorite holidays.  Unfortunately, I haven't had a chance to make much Halloween food this year.  I've got a few days left, though, so maybe I'll squeeze in the time to make something else.  Even if I don't, I'm pretty satisfied with this cute little number.  These are ridiculously simple to make and are quite the crowd pleaser. 

Source: The Girl Who Ate Everything

Here's what I used:
1 package (8 ounces) cream cheese, at room temperature
1 cup powdered sugar
3/4 cup creamy peanut butter (not all-natural)
3 tablespoons packed brown sugar
1 Cup Granulated Sugar

Red Food Coloring
Yellow Food Coloring
Black Tube Decorator's Icing
Yellow Tube Decorator's Icing
Teddy Grahams

Here's what I did:
1.  Beat cream cheese, powdered sugar, peanut butter and brown sugar in large mixer bowl until blended.

2.  Divide mixture into 3 even portions. 


3.  Spoon each portion onto a piece of plastic wrap; bring up all four corners and twist tightly forming into a ball shape.

3.  Refrigerate the balls overnight.


4.  Put sugar in a bowl.  Add  yellow and red food coloring, adding one drop of each color at a time.  Stir well until color is well blended into sugar.  Repeat until sugar attains the color of orange desired.

5.  Remove the balls from the refrigerator and unwrap. 

6.  Smash each ball down so that it is smashed into a circle (rather than being the shape of a ball).

7.  Place each circle in the bowl of sugar, one at a time, spooning sugar onto the circle until it is fully covered with orange sugar.

8.  Decorate each circle with the Jack-o-Lantern face desired.  I used the black icing to outline the eyes, nose, and mouth of each Jack-o-Lantern and then used the yellow to fill in each outline so it looked like a candle shining through. 

9.  Keep covered and refrigerated until ready to serve.  I served mine with both chocolate and graham cracker Teddy Grahams.

Happy Halloween!! 

Enjoy!

10.07.2011

Sirloin Skillet

0 comments


I'm always looking for a quick, easy dinner recipe.  This is an old recipe that I had printed out at one time (apparently) and came across in all this moving mayhem.  It still looked good, so I decided to give it a shot.  It was simple and quick and tasted delicious.  I served it over white rice.  I think it would be delicious on a tortilla too.

Slightly adapted from: Campbell's Kitchen

Here's what I used:
2 Tablespoons Olive Oil
1 Lb Boneless Beef Sirloin Steak, diced
1 Large White Onion, diced
2 Medium Red Peppers, sliced
2 Medium Green Peppers, sliced
3 Cloves Garlic, Minced
1 Can (10.75 ounces) Condensed Cream of Mushroom Soup
1/2 Cup Water
1 Cup Shredded Cheddar Jack Cheese

Here's What I did:
1.  Heat one tablespoon of Olive Oil in a skillet over medium-high heat.

2.  Cook the steak in the oil until thoroughly cooked.  Removed meat from skillet.

3.  Reduce heat to medium and add the remaining (1 Tbsp) oil to the pan.

4.  Add onions and peppers to pan.  Cook for 3 minutes, stirring occasionally.

5.  Add garlic and cook until the vegetables are tender.

6.  Stir in condensed soup and water.  Heat to boil.

7.  Return meat to the skillet and reduce heat to low. 

8.  Cover and cook for about 2 minutes.

9.  Sprinkle with cheese.


Enjoy!

8.12.2011

Cinnamon Puffs

0 comments


This recipe was supposed to be made for my book club meeting.  Of course I have try everything I make before I take it anywhere to share.  Just in case, you know?  What if something looks great, but tastes terrible? 

Well, I had one bite of one of these Cinnamon Puffs, and I was hooked.  Seriously, I decided these were too good to share (sorry book clubbers!).  I kept all of them for myself.  And I ate them all by myself.  Don't judge.  Try this recipe and you'll see.  I limited myself to one puff per day so I could stretch out the amazing oooey gooeyness for as long as possible. 

The marshmallow melts inside the puff and leaves a lovely little syrupy delight, making the puffs nice and moist.  The croissant is flaky and buttery.  And, who doesn't love cinnamon and sugar?  On everything?  That's not just me, right?  I could probably rave about these for hours and hours, but I imagine you all want me to get down to business.  So here you are:


Slightly adapted from:  The Girl Who Ate Everything

Here's what I used:

1 (8 ounce) Package refrigerated Crescent Rolls, Butter flavored

1/4 Cup Sugar

1 1/2 Tablespoon ground Cinnamon

8 large Marshmallows (not campfire sized, though)

1/4 Cup Butter, melted


Here's what I did:

1. Preheated the oven to 375 degrees and sprayed a muffin tin with cooking spray.

2.  I opened the can of crescent rolls and separated the rolls into triangles (just pull them apart - they should be perforated).

3. I combined the cinnamon and sugar in a cereal bowl and set it aside.

4.  I melted the butter in another cereal bowl.

5.  I submerged each marshmallow in the butter and then rolled it around in the cinnamon and sugar mixture. 

6.  After coating each marshmallow in cinnamon and sugar, I placed it in the center of a crescent roll triangle.

7.  I pulled the crescent roll dough triangles up around each marshmallow, sealing the edges of the roll around the marshmallow to keep the marshmallow in.  I call this a crescent roll package.

8.  I dipped the top 1/2 of each crescent roll package in the melted butter and then rolled each package around in the cinnamon and sugar.

9.  I placed each package in a separate muffin cup in my muffin pan, with the cinnamon and sugar side up.

10.  I baked these for about 13 minutes. 

These are great eaten warm, but don't eat them too quickly after you remove them from your oven because you'll burn your mouth.  And face.  Don't ask how I know that. 

After they had cooled completely, I'd warm each one in the microwave for about 15 seconds before eating them.  These go great with a small glass of milk.

Enjoy!